Complete Exchange Dynamic Distribution List Guide: PowerShell & EAC Management for Enterprise

What is a Dynamic Distribution List?
Why use a Dynamic Distribution List instead of a traditional distribution group? Traditional groups require manual member management—someone leaves the company, you have to remove them. Someone joins, you have to add them. Dynamic Distribution Lists use filters (like Department = 'Finance') that automatically update membership based on user attributes. Set it up once, and it stays accurate forever.
In Exchange Online, a Dynamic Distribution List (DDL) is a mail-enabled group whose membership is calculated each time an email is sent. Instead of manually adding and removing members, you define a recipient filter—such as department, location, or custom attributes—and Exchange dynamically builds the membership list at send time.
- ✓ Zero maintenance — No manual membership updates when employees join, leave, or change departments
- ✓ Always accurate — Membership reflects the latest user attributes from Microsoft Entra ID
- ✓ Consistent — The same filter applies to everyone, eliminating human error in group management
- ✓ Scalable — Works for 10 users or 10,000 users without performance impact
Prerequisites: Setting Up PowerShell for Exchange Online
First-Time PowerShell Setup
Open PowerShell as Administrator and run these commands:
# Install the Exchange Online Management module (if not already installed)
Install-Module -Name ExchangeOnlineManagement -Force -AllowClobber

# Import the module
Import-Module ExchangeOnlineManagement

# If you see "running scripts is disabled", run this first:
Set-ExecutionPolicy RemoteSigned -Scope CurrentUser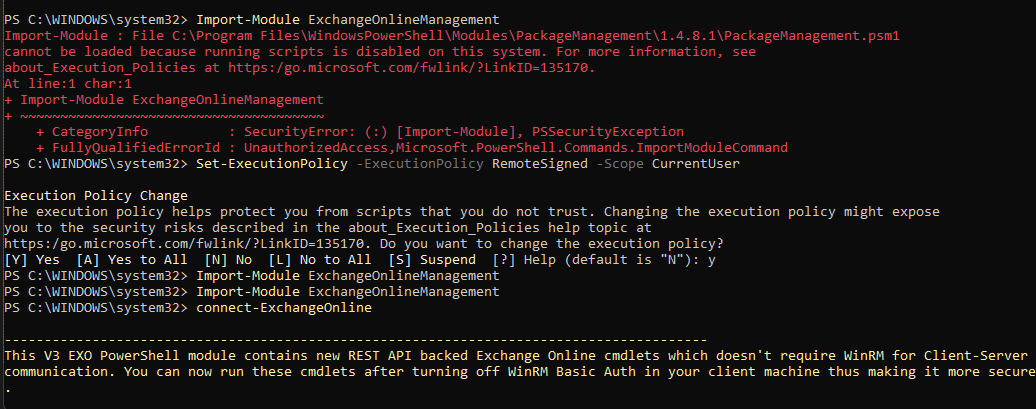
After the module is installed and imported, connect to Exchange Online:
# Connect to Exchange Online (opens login prompt)
Connect-ExchangeOnlineEAC vs PowerShell: Understanding the Management Trade-Offs
Dynamic Distribution Lists can be created in two ways, and each has implications for how you manage them going forward.
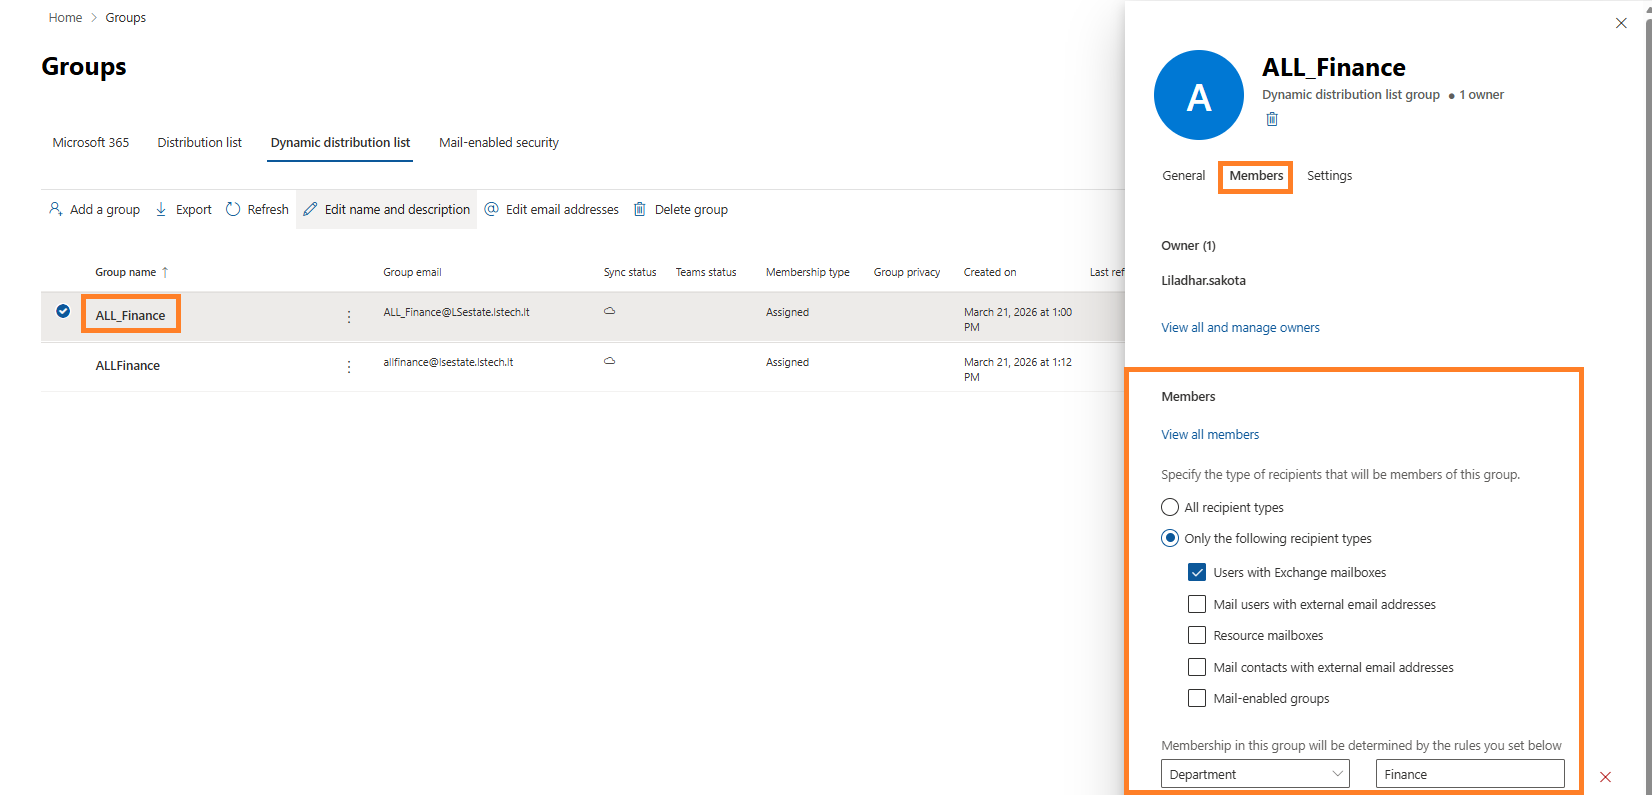
Exchange Admin Center (EAC)
- ✓ Visual interface — easy to see and modify
- ✓ Manage members via GUI
- ✓ Great for simple, one-off DDLs
- ✗ Limited filtering options
- ✗ No bulk operations
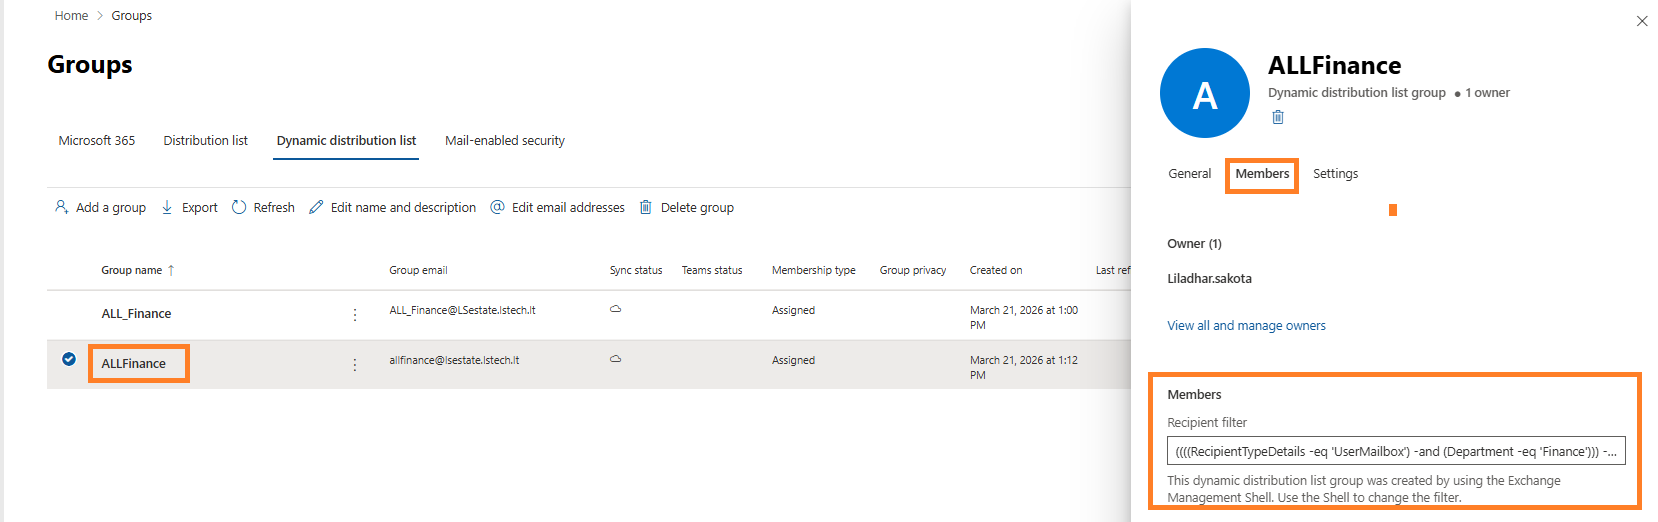
PowerShell
- ✓ Full control over complex filters
- ✓ Bulk creation and management
- ✓ Automatable and scriptable
- ✗ No GUI after creation — must manage via PowerShell
- ✗ Steeper learning curve
Create a Department-Based Dynamic Distribution List
This is the most common DDL scenario: a list for all active users in a specific department (e.g., Finance, HR, IT).
Basic DDL Creation (PowerShell)
Here's the command structure with proper escaping for PowerShell:
# Create a Finance department DDL with proper filtering
New-DynamicDistributionGroup `
    -Name "DDL-Finance" `
    -Alias "ddl-finance" `
    -PrimarySmtpAddress "finance@yourcompany.com" `
-RecipientFilter "((RecipientTypeDetails -eq 'UserMailbox') -and (Department -eq 'Finance') -and (AccountDisabled -eq `$false))"RecipientTypeDetails -eq 'UserMailbox'— Only include user mailboxes (excludes shared, room, equipment mailboxes)Department -eq 'Finance'— Filter by the department attribute in Microsoft Entra IDAccountDisabled -eq $false— Only active accounts (excludes disabled/former employees)
Excluding Shared Mailboxes and Service Accounts
Your organisation likely has shared mailboxes (like info@, support@) that shouldn't be included in department lists. Here's how to exclude them:
# Complete filter: Active user mailboxes only
New-DynamicDistributionGroup `
    -Name "DDL-Finance" `
    -Alias "ddl-finance" `
    -PrimarySmtpAddress "finance@yourcompany.com" `
-RecipientFilter "((RecipientTypeDetails -eq 'UserMailbox') -and (Department -eq 'Finance') -and (AccountDisabled -eq `$false))"Restrict Who Can Send to the DDL (Sender Management)
Department lists often contain sensitive information. By default, anyone can email a DDL, which can lead to spam or information leaks. Restricting senders is a critical security step.
- Prevent external users from emailing internal department lists
- Stop marketing/recruitment spam sent to entire departments
- Protect confidential department communications
- Reduce mailbox clutter for users
Method 1: Restrict to Specific Users (PowerShell)
# Restrict the Finance DDL to specific users
Set-DynamicDistributionGroup "DDL-Finance" `
    -AcceptMessagesOnlyFrom "ceo@yourcompany.com", "hr-manager@yourcompany.com", "finance-director@yourcompany.com"
Method 2: Restrict to a Security Group (Recommended for Large Organizations)
Managing individual users becomes messy when you have dozens of senders. Instead, create a Microsoft Entra security group and add senders to that group. Then restrict the DDL to that group.
# First, create a security group in Microsoft Entra ID (via Portal or PowerShell)
# Then restrict the DDL to that group's members
Set-DynamicDistributionGroup "DDL-Finance" `
-AcceptMessagesOnlyFromDLMembers "Executive-Team"-AcceptMessagesOnlyFromDLMembers with a security group gives you centralised sender management. Add or remove senders from the group without touching the DDL configuration. Perfect for organisations where sender permissions change frequently.
Method 3: Exchange Admin Center (GUI)
For visual learners, here's how to do it in EAC:
- Go to Exchange Admin Center → Groups
- Find and select your DDL
- Click Settings → Sender management
- Select "Only senders inside my organization" or "Specific senders"
- Add the allowed users or groups
Verify Your Sender List
# Check who can send to the DDL
(Get-DynamicDistributionGroup "DDL-Finance").AcceptMessagesOnlyFrom | Get-Recipient | Select Name, PrimarySmtpAddressView Current Members of a Dynamic Distribution List
Since DDL membership is calculated dynamically, you need special commands to see who would receive emails sent to the list.
View Members of a Single DDL
# Get members of a specific DDL with formatted output
$ddl = Get-DynamicDistributionGroup "DDL-Finance"

Get-Recipient -RecipientPreviewFilter $ddl.RecipientFilter `
    -OrganizationalUnit $ddl.RecipientContainer |
    Select-Object Name, DisplayName, PrimarySmtpAddress, Department |
    Sort-Object Name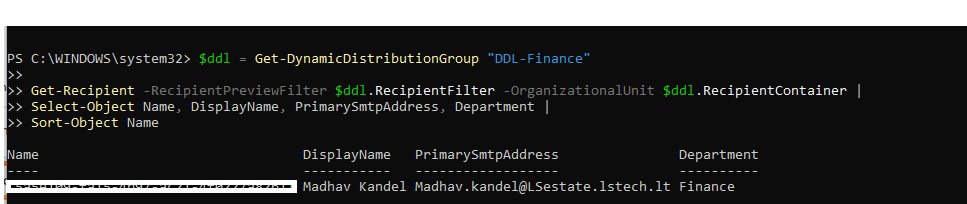
View Members of Multiple DDLs (Finance, HR, IT, etc.)
# Define your DDLs
$ddls = @("DDL-Finance", "DDL-HR", "DDL-IT", "DDL-Sales", "DDL-Marketing")

foreach ($ddlName in $ddls) {
    $ddl = Get-DynamicDistributionGroup $ddlName
    Write-Host "===== $($ddl.Name) =====" -ForegroundColor Cyan

    Get-Recipient -RecipientPreviewFilter $ddl.RecipientFilter `
        -OrganizationalUnit $ddl.RecipientContainer |
        Select-Object @{Name="DDLName";Expression={$ddl.Name}},
                      Name, DisplayName, PrimarySmtpAddress, Department |
        Sort-Object Name
}
Export Members to CSV for Auditing
For compliance or reporting, you can export the member list to a CSV file:
# Export single DDL to CSV
$ddl = Get-DynamicDistributionGroup "DDL-Finance"

Get-Recipient -RecipientPreviewFilter $ddl.RecipientFilter `
    -OrganizationalUnit $ddl.RecipientContainer |
    Select-Object Name, DisplayName, PrimarySmtpAddress, Department |
    Sort-Object Name |
    Export-Csv "C:\Temp\DDL-Finance-Members.csv" -NoTypeInformation -Encoding UTF8

# Export ALL DDLs in the organization to CSV
$allDDLs = Get-DynamicDistributionGroup

foreach ($ddl in $allDDLs) {
    Write-Host "Exporting $($ddl.Name)..." -ForegroundColor Yellow

    Get-Recipient -RecipientPreviewFilter $ddl.RecipientFilter `
        -OrganizationalUnit $ddl.RecipientContainer |
        Select-Object @{Name="DDLName";Expression={$ddl.Name}},
                      Name, DisplayName, PrimarySmtpAddress, Department |
        Sort-Object Name |
        Export-Csv "C:\Temp\All-DDLs-Members.csv" -NoTypeInformation -Encoding UTF8 -Append
}C:\Temp\ folder on your machine. The CSV file opens in Excel for easy review.
Add Exception Users to a DDL (e.g., Executives from Other Departments)
Sometimes you need to add specific people to a DDL even though they don't match the filter. For example, the CEO might need to be included in the "DDL-IT" list for security alerts, even though their department is "Executive".
Method 1: Using Custom Attributes (Recommended for Cloud-Only Users)
This method uses a custom attribute (like CustomAttribute1) as a flag for exceptions.
# Step 1: Tag the exception users with a custom attribute
Set-Mailbox "ceo@yourcompany.com" -CustomAttribute1 "FinanceDDLException"
Set-Mailbox "cto@yourcompany.com" -CustomAttribute1 "FinanceDDLException"

# Step 2: Update the DDL filter to include users with that attribute
Set-DynamicDistributionGroup "DDL-Finance" `
-RecipientFilter "((RecipientTypeDetails -eq 'UserMailbox') -and (AccountDisabled -eq `$false) -and ((Department -eq 'Finance') -or (CustomAttribute1 -eq 'FinanceDDLException')))"extensionAttribute1 instead of CustomAttribute1. You'll need to set this in your on-premises Active Directory and sync it via Entra Connect.
Method 2: Using Email Address Directly (Simple, One-Off Exceptions)
For 1-2 users, you can add them directly by their email address:
# Add specific users by their primary email address
Set-DynamicDistributionGroup "DDL-Finance" `
    -RecipientFilter "((RecipientTypeDetails -eq 'UserMailbox') -and (AccountDisabled -eq `$false) -and ((Department -eq 'Finance') -or (PrimarySmtpAddress -eq 'ceo@yourcompany.com') -or (PrimarySmtpAddress -eq 'cto@yourcompany.com')))"
When you view the filter after this change, it will look something like this (notice the complex nested conditions):
# View the actual filter
(Get-DynamicDistributionGroup "DDL-Finance").RecipientFilter

# Output shows the full filter with automatic exclusions
# ((((RecipientTypeDetails -eq 'UserMailbox') -and (((((Department -eq 'Finance') -or (PrimarySmtpAddress -eq 'ceo@yourcompany.com'))) -or (PrimarySmtpAddress -eq 'cto@yourcompany.com'))))) -and (-not(Name -like 'SystemMailbox{*')) -and (-not(Name -like 'CAS_{*')) -and (-not(RecipientTypeDetailsValue -eq 'MailboxPlan')) -and (-not(RecipientTypeDetailsValue -eq 'DiscoveryMailbox')) ...)
How to Roll Back to the Original Filter
If you need to revert changes and go back to the clean department-only filter:
# Reset to original department-only filter (with system exclusions)
Set-DynamicDistributionGroup "DDL-Finance" -RecipientFilter "((((RecipientTypeDetails -eq 'UserMailbox') -and (Department -eq 'Finance'))) -and (-not(Name -like 'SystemMailbox{*')) -and (-not(Name -like 'CAS_{*')) -and (-not(RecipientTypeDetailsValue -eq 'MailboxPlan')) -and (-not(RecipientTypeDetailsValue -eq 'DiscoveryMailbox')) -and (-not(RecipientTypeDetailsValue -eq 'PublicFolderMailbox')) -and (-not(RecipientTypeDetailsValue -eq 'ArbitrationMailbox')) -and (-not(RecipientTypeDetailsValue -eq 'AuditLogMailbox')) -and (-not(RecipientTypeDetailsValue -eq 'AuxAuditLogMailbox')) -and (-not(RecipientTypeDetailsValue -eq 'SupervisoryReviewPolicyMailbox')))"Include Multiple Departments in One DDL
Sometimes you need a DDL that spans multiple departments, like Finance and Data teams collaborating on a project.
# Create a DDL for both Finance and Data departments
Set-DynamicDistributionGroup "DDL-Finance-Data" `
    -RecipientFilter "((((RecipientTypeDetails -eq 'UserMailbox') -and ((Department -eq 'Finance') -or (Department -eq 'Data')))) -and (-not(Name -like 'SystemMailbox{*')) -and (-not(Name -like 'CAS_{*')) -and (-not(RecipientTypeDetailsValue -eq 'MailboxPlan')) -and (-not(RecipientTypeDetailsValue -eq 'DiscoveryMailbox')) -and (-not(RecipientTypeDetailsValue -eq 'PublicFolderMailbox')) -and (-not(RecipientTypeDetailsValue -eq 'ArbitrationMailbox')) -and (-not(RecipientTypeDetailsValue -eq 'AuditLogMailbox')) -and (-not(RecipientTypeDetailsValue -eq 'AuxAuditLogMailbox')) -and (-not(RecipientTypeDetailsValue -eq 'SupervisoryReviewPolicyMailbox')))"
Verify the Members
# Check who's in the combined DDL
$ddl = Get-DynamicDistributionGroup "DDL-Finance-Data"

Get-Recipient -RecipientPreviewFilter $ddl.RecipientFilter `
    -OrganizationalUnit $ddl.RecipientContainer |
    Select Name, PrimarySmtpAddress, Department |
Sort-Object Name(Department -eq 'Finance') -or (Department -eq 'Data') includes users from either department. You can chain as many -or conditions as needed.
Best Practices for Dynamic Distribution Lists
- Always exclude disabled accounts: Include
AccountDisabled -eq $falsein every filter to prevent emails to former employees. - Use security groups for sender management: Instead of listing individual users, create a security group and use
-AcceptMessagesOnlyFromDLMembers. Much easier to maintain. - Document your filters: Complex filters with custom attributes should be documented. Six months from now, you'll forget why you added that exception.
- Test with a small DDL first: Before deploying to a large department, create a test DDL with a small subset to verify the filter works as expected.
- Regularly audit membership: Use the export commands quarterly to verify that DDL membership matches your expectations.
- Don't create DDLs for frequently changing groups: If membership changes daily, a traditional distribution group might be better. DDLs are best for stable attributes like department or location.
Frequently Asked Questions
Summary: You Now Have a Complete DDL Management Strategy
Congratulations! You now have a complete understanding of Dynamic Distribution Lists in Exchange Online. You can:
- ✓ Create department-based DDLs that auto-update as employees join/leave
- ✓ Restrict senders to prevent unauthorised emails to large groups
- ✓ View and export current membership for auditing
- ✓ Add exception users without breaking existing filters
- ✓ Include multiple departments in a single DDL
- ✓ Manage DDLs via both PowerShell and Exchange Admin Center (with the right trade-offs)
Next Steps for Your Organisation:
- Audit your current DDLs: Run the export commands to document all existing DDLs and their members
- Standardise department names: Inconsistent department values (e.g., "Finance" vs "Fin") will break DDL filters. Standardise your Entra ID department attributes.
- Set up sender restrictions: Review which DDLs need to be restricted and implement security groups for sender management
- Document exception handling: If you use custom attributes for exceptions, document what each attribute means