Complete Windows Autopatch Setup Guide: Microsoft-Managed Updates for Enterprise

What is Windows Autopatch?
Why use another service for Windows updates when the builder and owner (Microsoft) is doing it themselves and making admin's life easier?
Normally, organisations with Business Premium licenses have Intune by default. You can make the most of Intune—not only to manage devices and protect company resources but also to apply Windows updates.
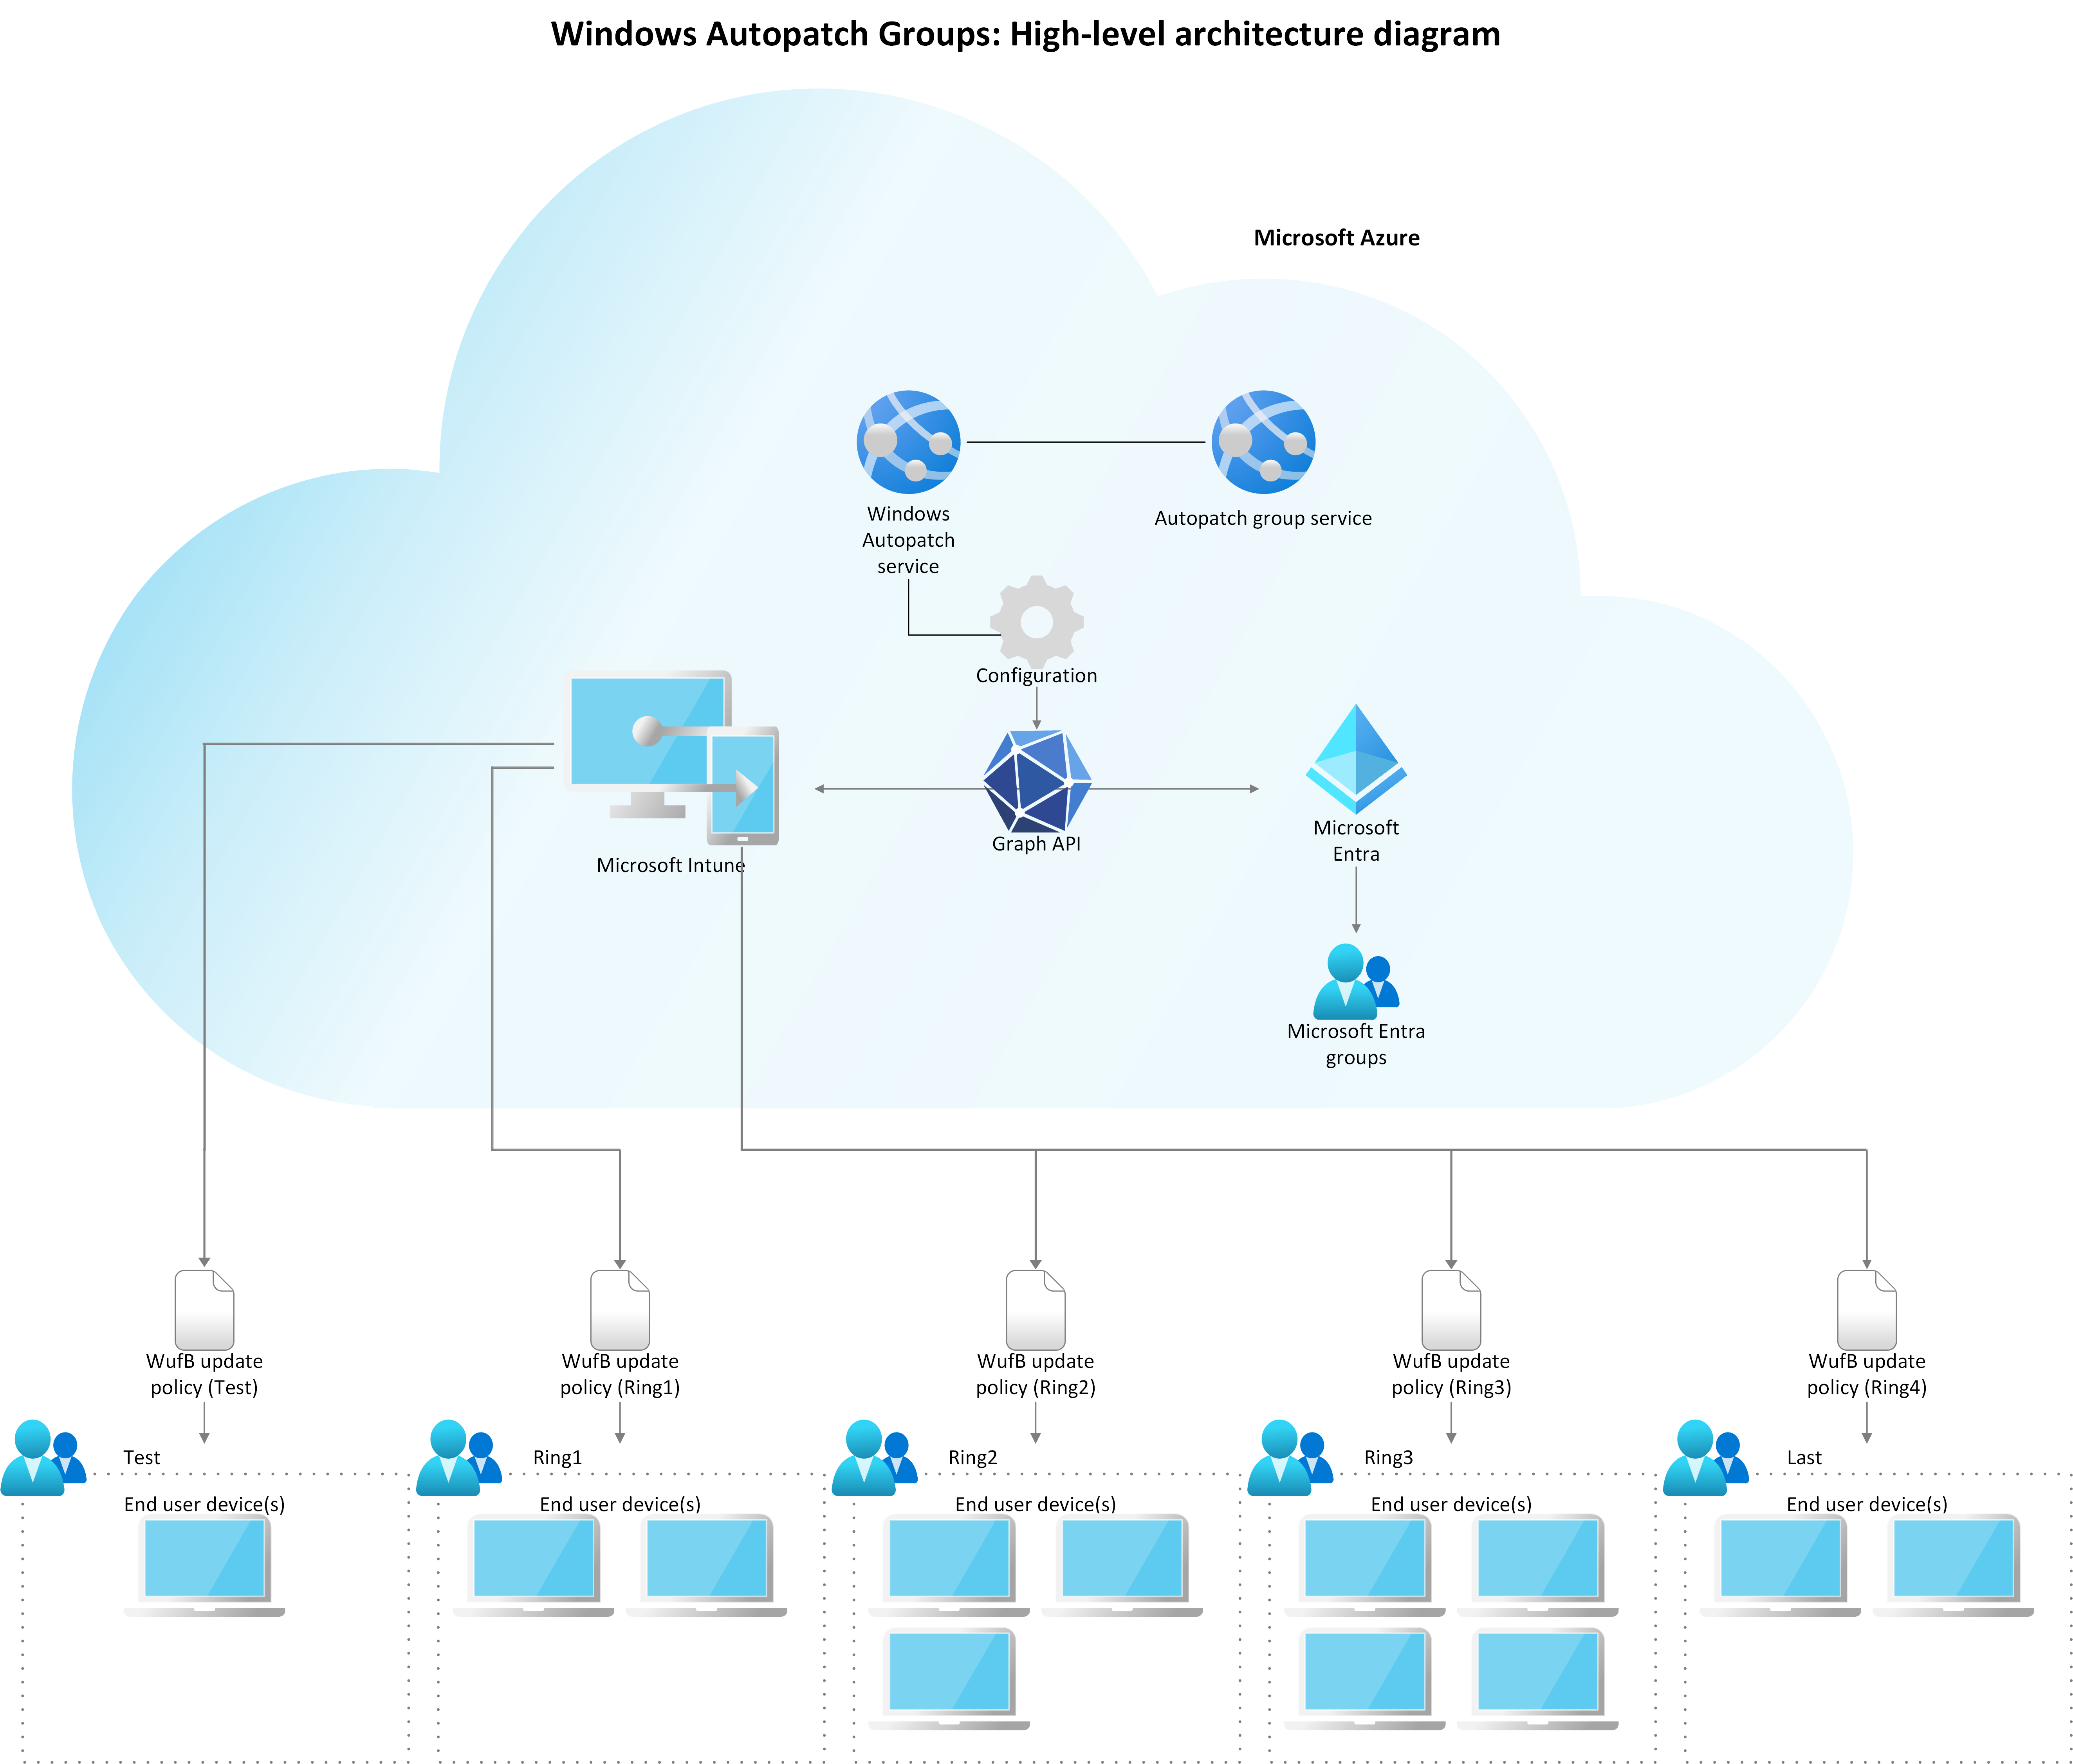
Windows Autopatch is a Microsoft cloud service that automatically manages updates for Windows devices, Microsoft 365 apps, drivers, and security patches in your organisation. Instead of IT teams manually testing and deploying updates, Autopatch organises devices into deployment rings. Updates are first tested on a small group of devices, then gradually rolled out to the rest of the organisation.
- ✓ Reduces the risk of updates breaking important systems
- ✓ Ensures all devices stay secure and compliant
- ✓ Saves IT teams time by automating update testing, scheduling, and monitoring
- ✓ Provides a safer, more reliable, and efficient way to manage updates
What You Need Before Starting
- Licenses: Windows 10/11 Enterprise E3 or E5 (included in Microsoft 365 F3, E3, or E5)
- Microsoft Intune: Devices must be enrolled in Intune and co-managed (if using Config Manager)
- Microsoft Entra ID: P1 or P2 license required
- Windows versions: Windows 10/11 Pro, Enterprise, or Education (not Home)
- Permissions: Global Administrator or Intune Administrator access
- Diagnostic data: Must be set to "Optional (Full)" – this is mandatory!
Activate Windows Autopatch in Your Tenant
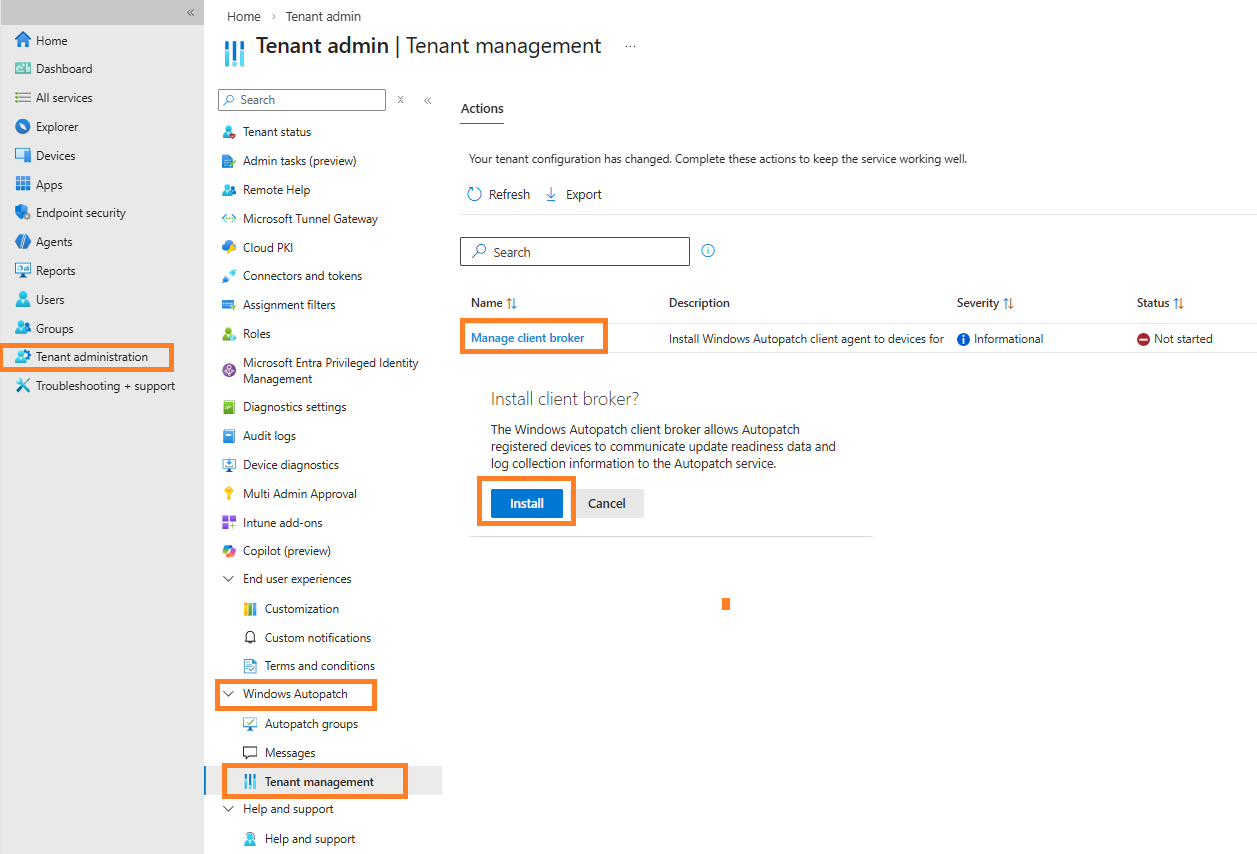
First, you need to enable Autopatch in your Microsoft Intune admin center. This is a one-time setup that prepares your tenant.
Click on Activate and follow the wizard. This process will:
- Add admin contacts for notifications
- Review changes made during tenant registration
- Create necessary service principals and permissions
Add Devices to the Autopatch Device Registration Group
Windows Autopatch - Devices AllAfter activation, Autopatch automatically creates several Microsoft Entra groups. The most important one is the device registration group.
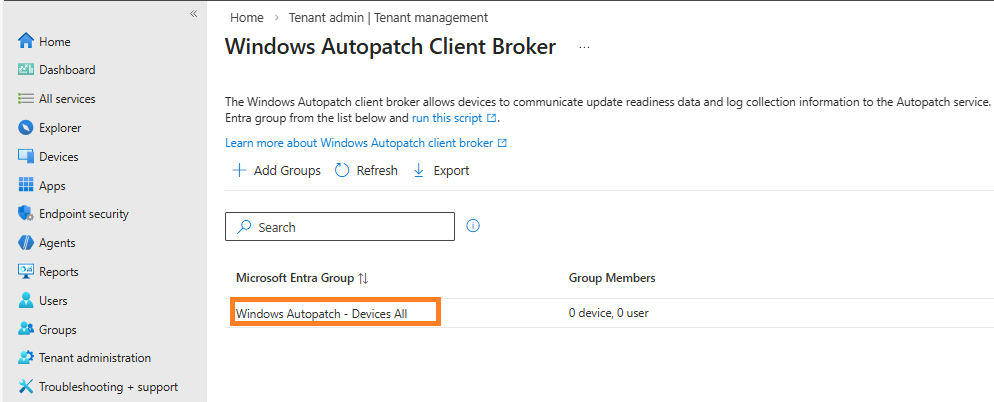
This part is critical: Whatever devices are in this group will have the Autopatch client apps installed silently in the background—no need to push from Intune manually!
Create an Autopatch Group
Now you need to create an Autopatch group. This defines how updates roll out across your organisation.
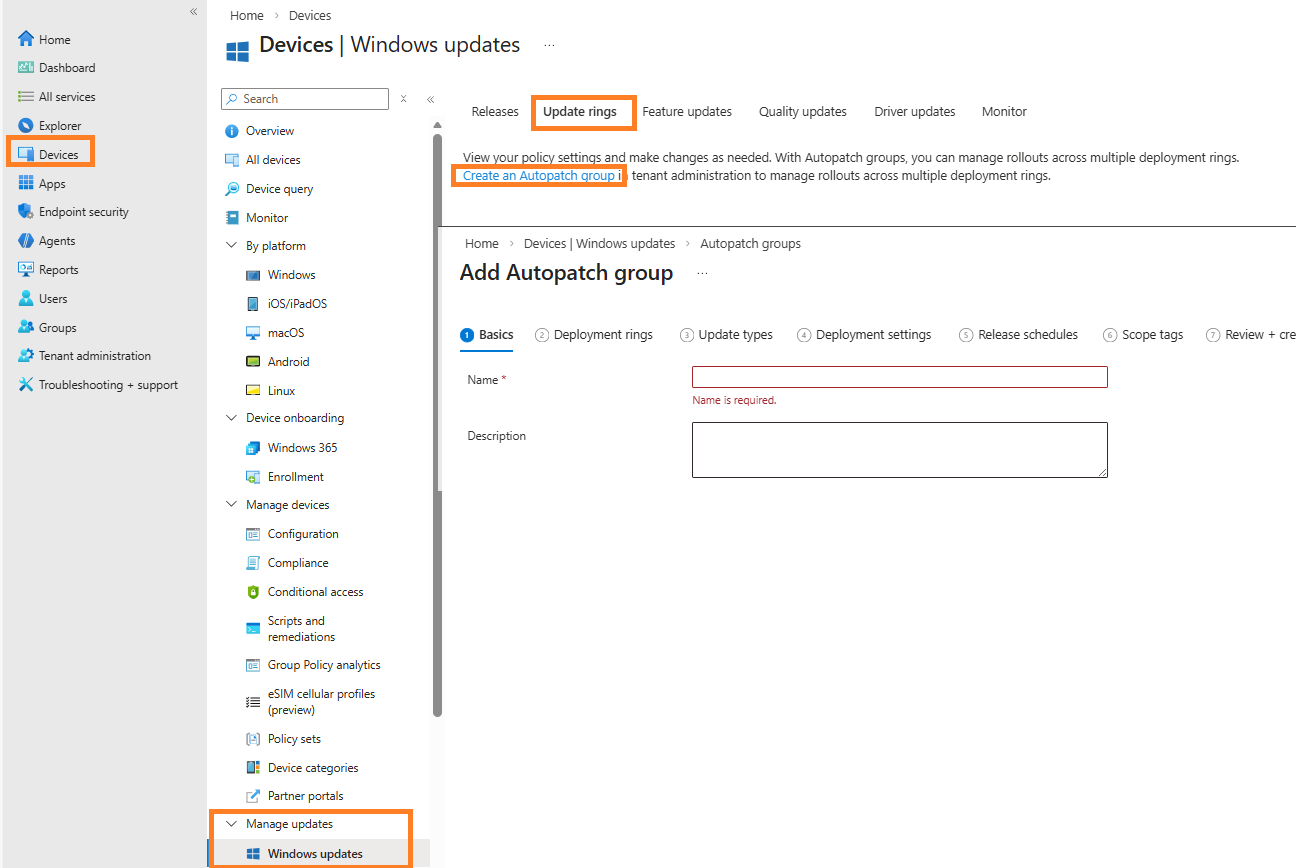
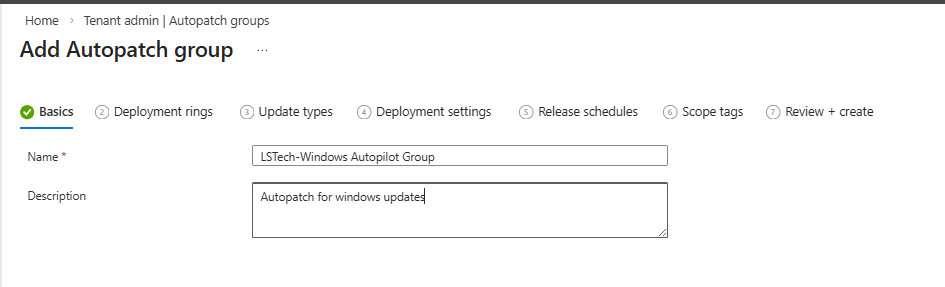
Name Your Autopatch Group
Give it a clear, descriptive name that makes sense for your organisation.
Configure Deployment Rings
Deployment rings are how Autopatch controls which devices get updates first. You decide which groups go into which rings.
When we set this up for organisations, we always use 5 rings. The names and descriptions need to be clear because when you have hundreds or thousands of security groups in Entra ID, you don't want to guess what "Ring1" means six months from now.
Here's how we break it down:
Test ring gets two devices. Just two. These are usually spare laptops or the devices of the IT person who volunteered to be the guinea pig. If an update completely breaks Windows, only two people are affected.
Ring 1 is the entire IT department. Not just the infrastructure team—everyone in IT. They understand that things might break and they know how to report issues. This is your early warning system.
Ring 2 is about 10% of your regular users. Pick people who are tech-savvy and won't panic if something looks different after an update. The finance person who's good with computers, the marketing coordinator who likes new features. They catch the issues that only show up in real work, not just IT testing.
Ring 3 is everyone else—roughly 80% of your devices. By the time updates reach this ring, they've been through IT and your early adopters. Most problems should already be caught.
Last ring is for executives. The CEO, the directors, anyone who can't afford a single hiccup during a board meeting presentation. Updates hit this ring last, after everyone else has proven they're safe.
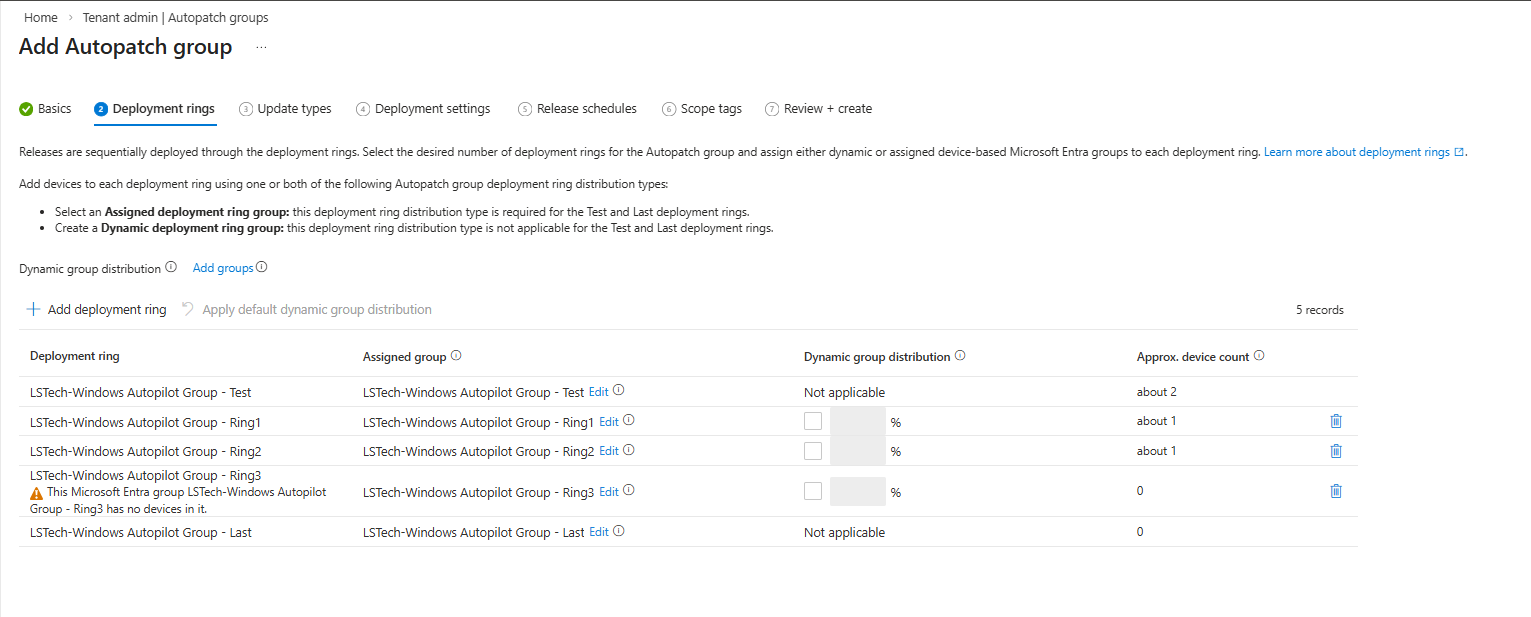
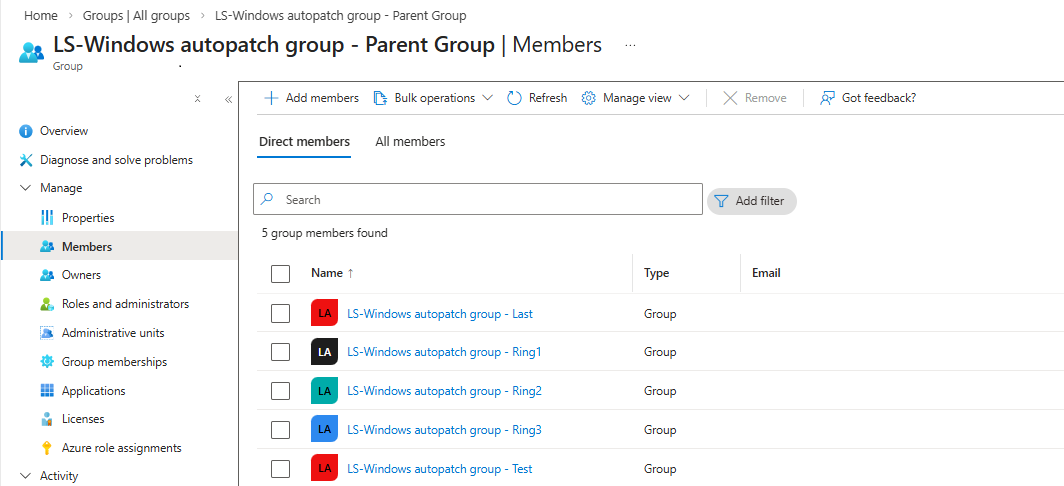
How we set this up in production: We prefer to have 5 rings with clear security group names and descriptions. This makes it easy to maintain when you have thousands of security groups.
this is because autopatch will create own group under exact same name as deployment ring : LS-Autopatch group -Test in Entra group, so if the same name already exists it will give us an error, preventing from creating autopatch groups.
Select Update Types
Now you need to choose which types of updates Autopatch will manage.
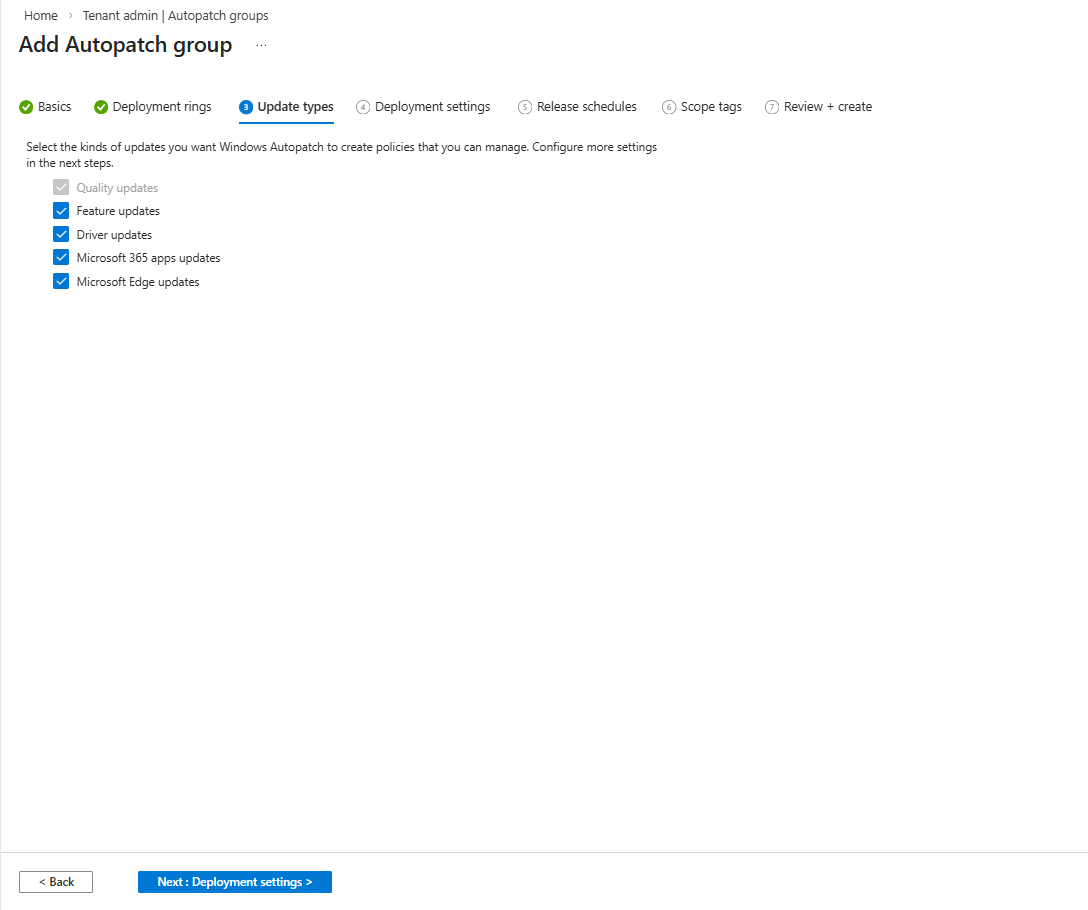
How we set this up in production: Select ALL of them. Check every single box:
- ✅ Quality updates (monthly security patches)
- ✅ Feature updates (major Windows versions like 25H2)
- ✅ Driver updates (for hardware like graphics, network, printers)
- ✅ Microsoft 365 Apps updates (Office, Teams)
- ✅ Microsoft Edge updates (browser)
Configure Deployment Settings
These settings control how updates are deployed to your devices.
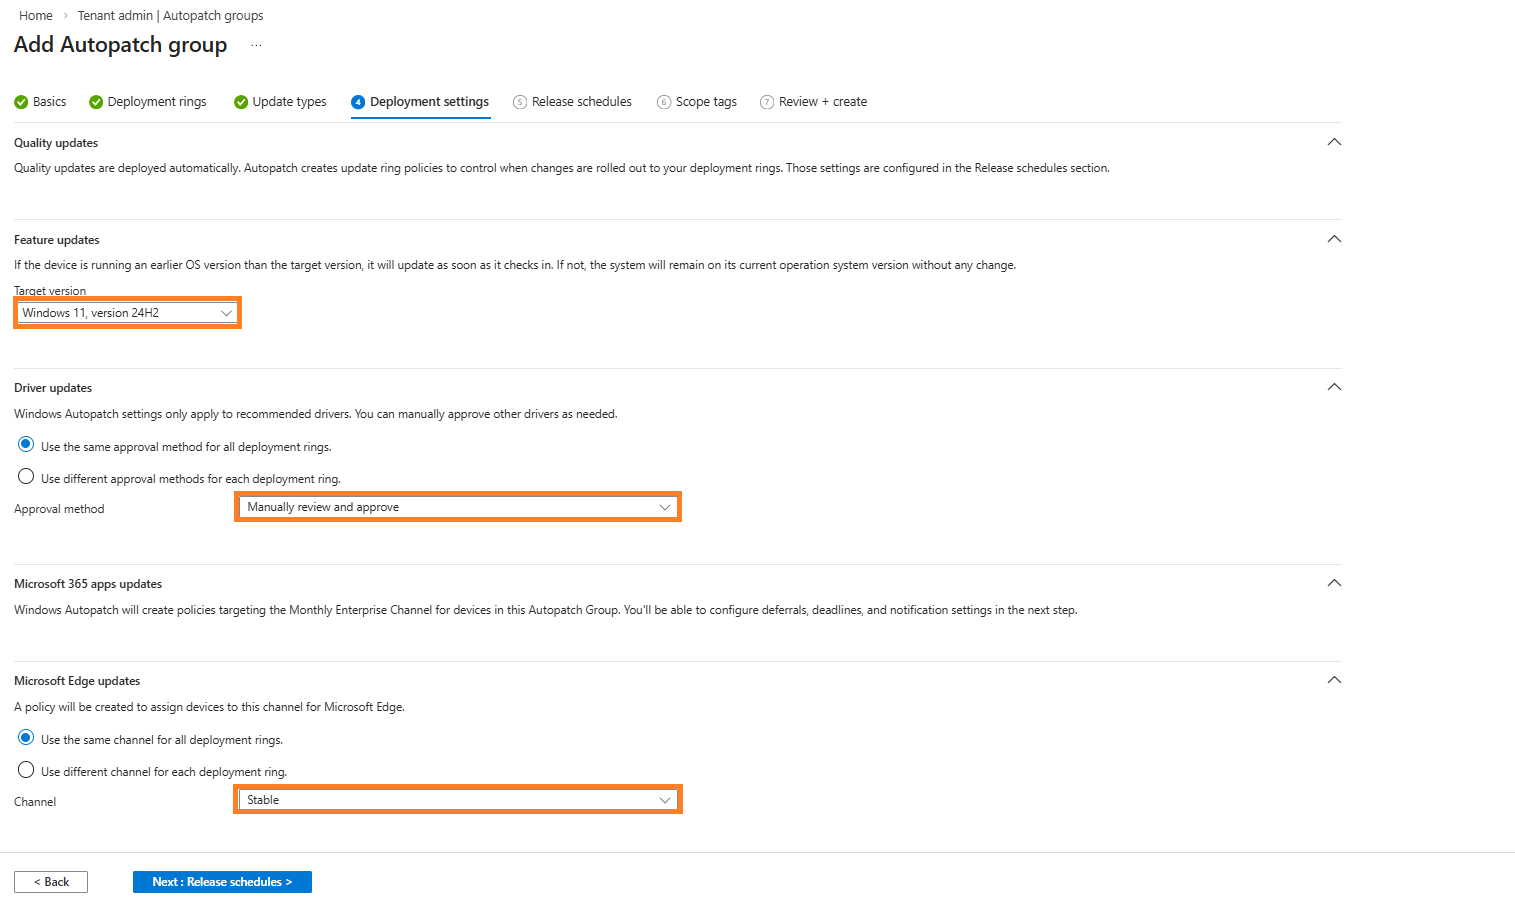
Feature Updates
How we set this up in production: Feature updates stay 6-12 months behind because of too many bugs and issues. This gives Microsoft time to fix problems before they reach your users.
Driver Updates
This is where many admins get confused. Let's break it down simply:
Microsoft's Official Recommendation
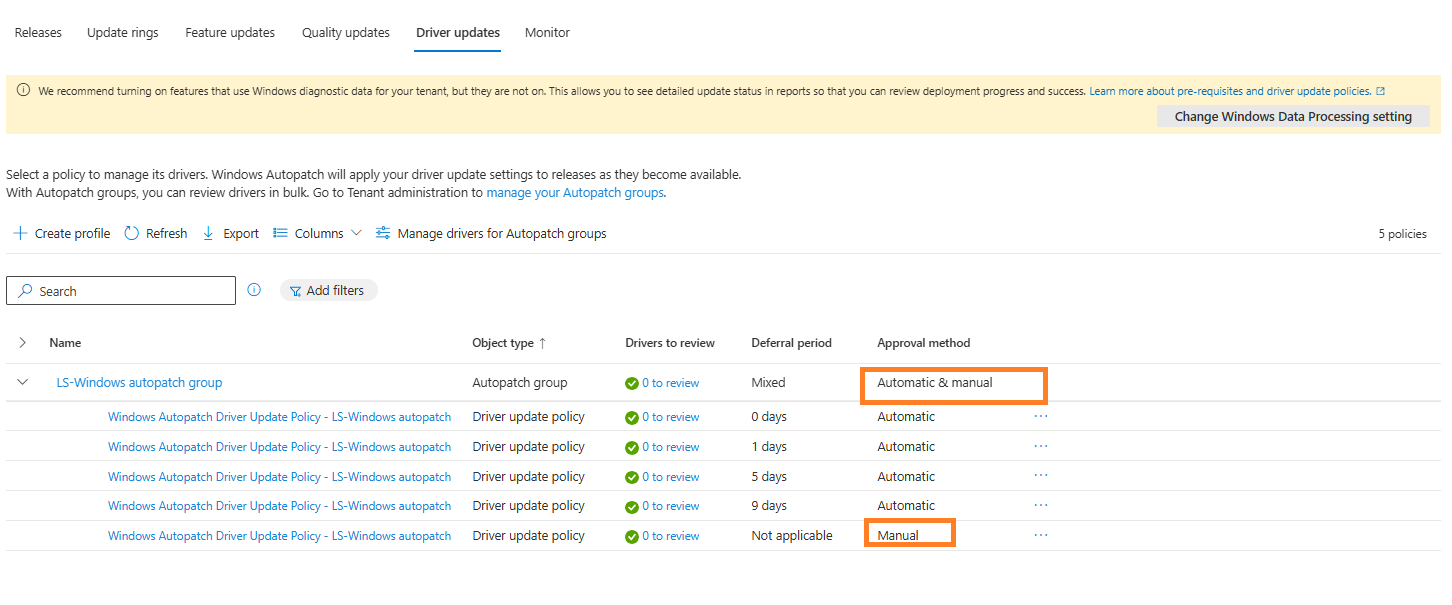
Microsoft explicitly states that Automatic mode is recommended for organisations with standard OEM devices (Lenovo, Dell, HP) where no recent driver or hardware issues have occurred due to Windows Updates.
How the "Recommended Drivers" concept works:
When you choose Automatic, only recommended drivers deploy automatically. These are:
- The latest driver version that the OEM (Lenovo, Dell, HP) has marked as "required"
- The same drivers available through Windows Update that have been certified and validated by manufacturers
- The best match for your specific device models
For executive devices (Last ring): We choose Manual mode. Executives don't want unexpected driver changes that might break something important during a presentation.
Microsoft 365 Apps
Set to Monthly Enterprise Channel. This gives you updates once per month with plenty of testing time.
Microsoft Edge
Set to Stable channel for security and compliance. No beta versions in production!
Configure Release Schedules and Active Hours
This is where you tell Windows when it's allowed to restart devices after installing updates. Get this wrong and you'll have angry users. Get it right and no one even notices updates happened.
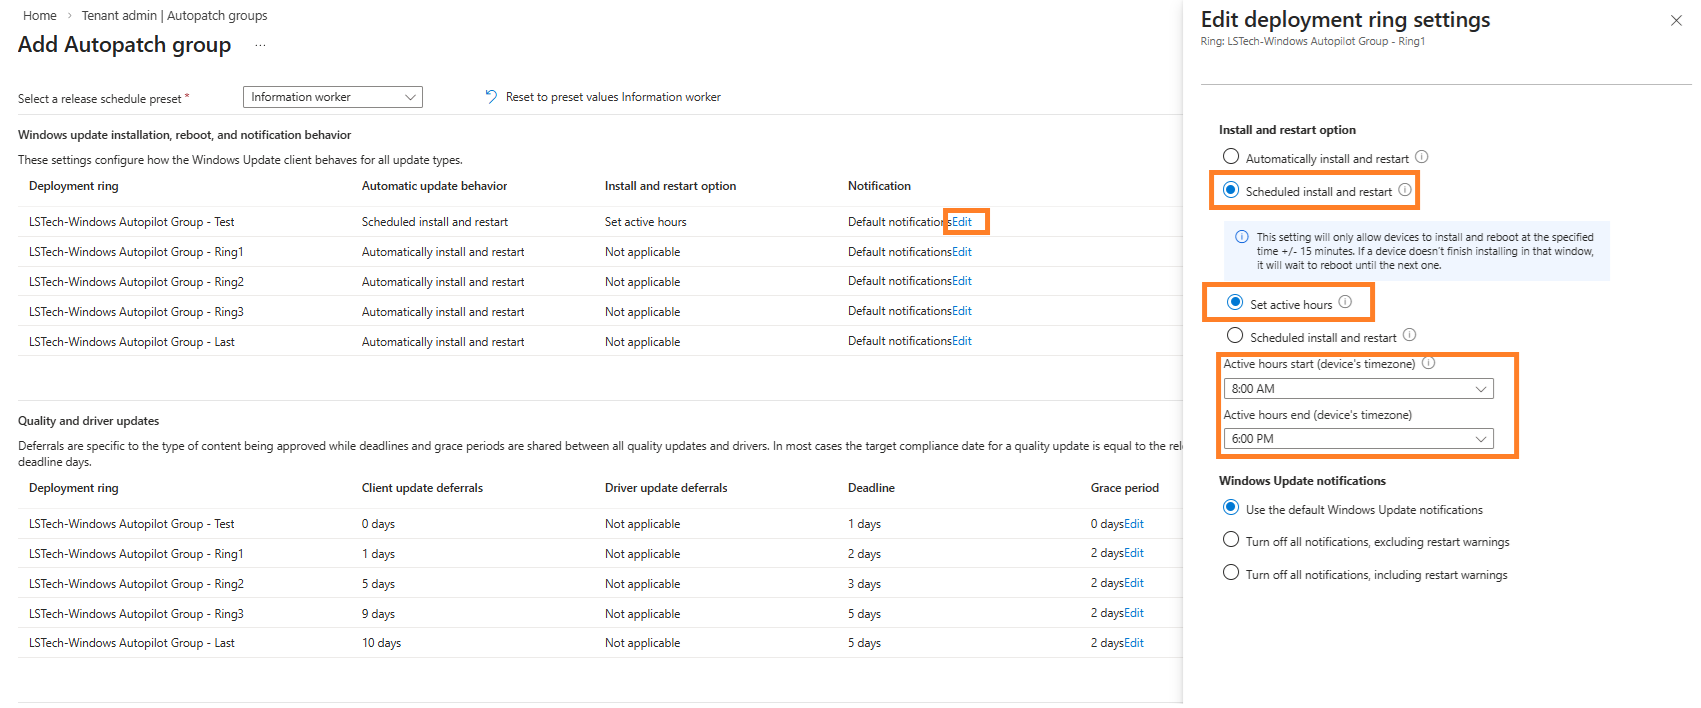
Why Active Hours Matter
Nobody likes their computer restarting in the middle of work. Active hours are simply the time window you tell Windows: "Do NOT restart during these hours because people are actually using their devices."
How we set this up in production: We set active hours from 8:00 AM to 6:00 PM. This covers the standard workday plus a buffer for people who start early or stay late. Updates download and install during the day silently in the background, but the actual restart waits until after 6 PM.
How We Configure Each Ring
Different rings get different treatment because they have different purposes:
Test ring uses "Scheduled install and restart" with active hours. Why? Because test devices might be shared or used for demos. We still want to be respectful, but we need updates to happen reliably for testing.
Rings 1, 2, 3, and Last are set to "Automatically install and restart" with active hours. This means:
- Updates install automatically when available (during the day, silently)
- Restarts only happen outside active hours (after 6 PM)
- If a restart is pending and the device is on at 6:01 PM, it will restart
- If the device is turned off overnight, it restarts first thing in the morning when someone powers it on
- Deferral: How many days after Microsoft releases an update before we offer it to this ring
- Deadline: How many days after the update installs before a restart is forced
- Grace period: Extra days after deadline before forced restart happens
The Philosophy Behind These Numbers
You might wonder why we don't just set everything to "install immediately and restart tonight." Here's the thinking:
Test ring at 0 days deferral catches bad updates from Microsoft immediately. If Microsoft releases a broken update on Patch Tuesday, Test ring finds out on Wednesday.
Ring 1 at 1 day gives IT the update on Thursday. They have the whole day to test and report issues before we release to anyone else.
Ring 2 at 5 days means early adopters get updates the following Tuesday. That's nearly a full week for IT to find showstopper bugs.
Ring 3 at 9 days puts production updates almost two weeks after release. By then, any major issues should be public knowledge and hopefully fixed.
Last at 10 days adds one more day of buffer for executives, just in case.
What About Users Who Never Shut Down?
Some users leave their laptops running for weeks. Updates will install but restarts get postponed until active hours end. If they never shut down and it's been days past the deadline, Windows will eventually force a restart even during active hours. This is intentional—updates need to complete for security.
The grace period gives them 2 extra days after the deadline before this forced restart happens.
Verify Successful Setup
After completing the wizard, you should see a success message confirming your Autopatch group is created.
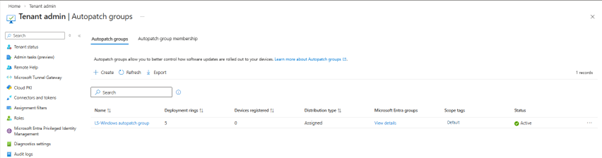
What Happens in the Background
Once your Autopatch group is created and devices are in the registration group, here's what happens automatically:
- Device added to Autopatch device registration group (you did this in Step 2)
- Autopatch service scans the group periodically (every few hours)
- Device eligibility is checked (license, Intune enrolment, OS version, diagnostic data setting)
- Device gets registered in Windows Autopatch (this takes time!)
- Device is placed into Test / Ring1 / Ring2 / Ring3 / Last based on your group assignments
Monitoring Your Autopatch Deployment
Now that everything is set up, you need to monitor its health. Here are the key places to check:
Feature Updates
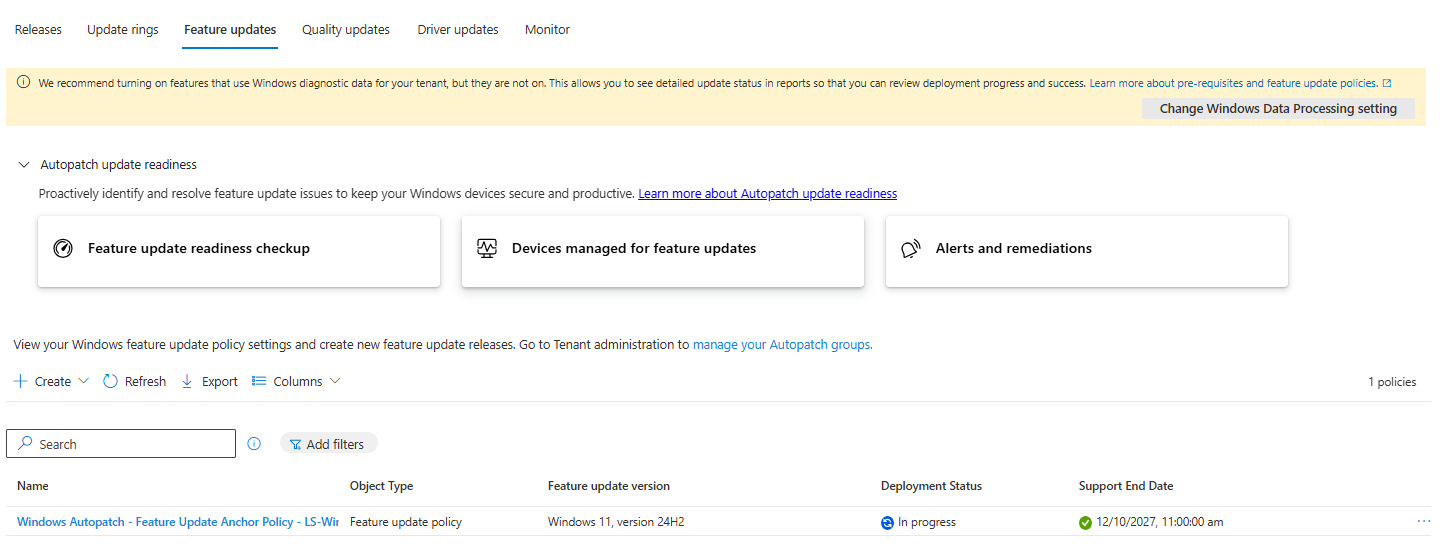
Driver Updates
Autopatch Management Status
This is your main dashboard for seeing how Autopatch is working across all devices.
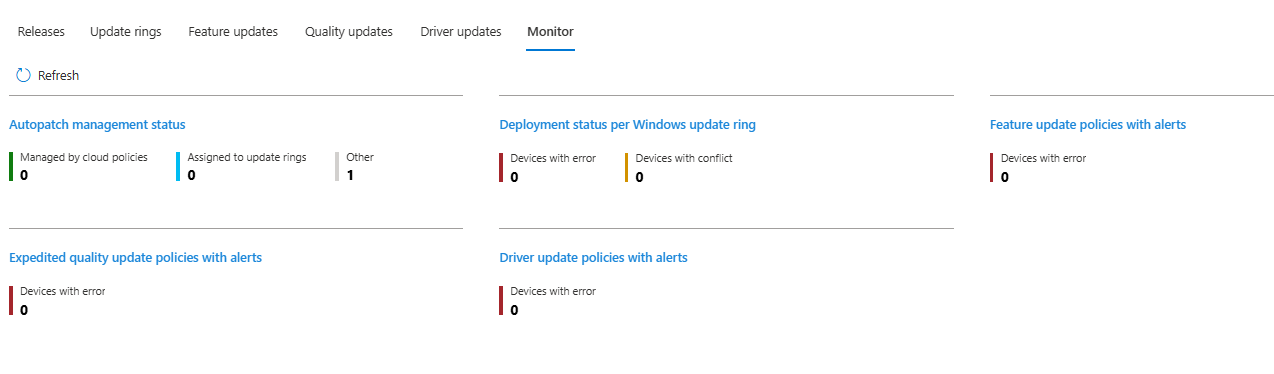
What to watch:
- Autopatch management status (registered vs. not ready)
- Deployment status per Windows update ring
- Feature update policies with alerts
- Driver update policies with alerts
Troubleshooting: Is Autopatch Working?
The most common question: "I set everything up, why don't I see devices?"
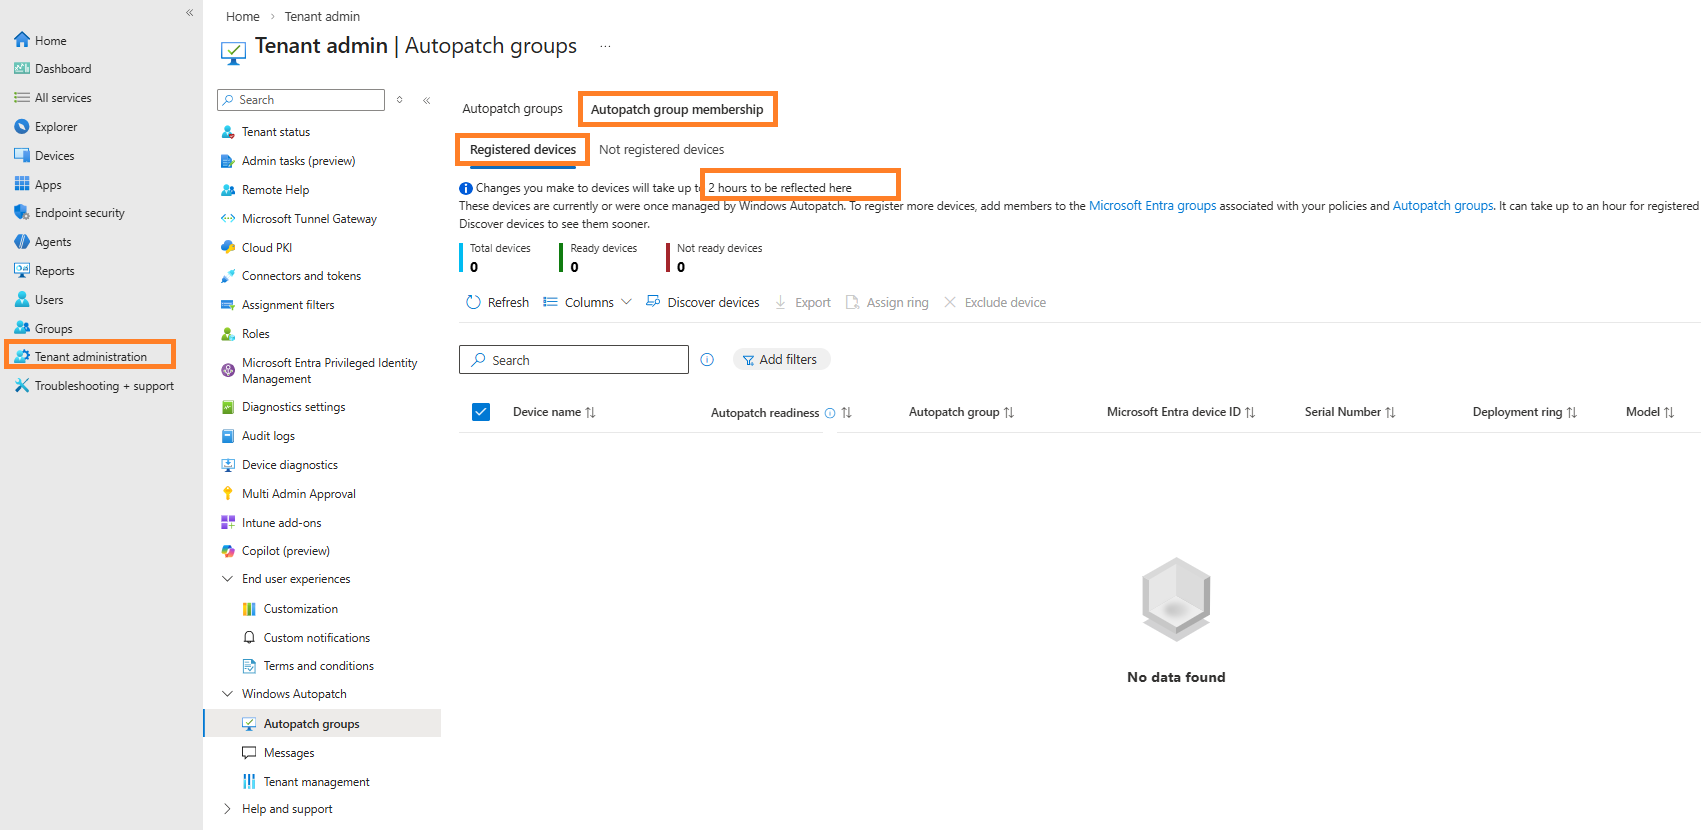
Key Troubleshooting Steps
- Check the "Not ready" tab: This screen will show all devices after the Autopatch broker is installed. If devices are stuck, they'll appear here with error messages.
- Wait for the broker: The Autopatch client broker can take 2 hours to be reflected here after installation. Sometimes longer.
- Be patient: Complete registration can take 48-72 hours in complex environments.
- Verify on a device: Check if the broker is installed at C:\Program Files\Microsoft Update Health Tools
Common "Not Ready" Reasons
- Diagnostic data not set to "Full": The most common blocker!
- Device hasn't synced with Intune recently: Force a sync in Settings → Accounts → Access work or school
- Wrong Windows edition: Autopatch requires Pro, Enterprise, or Education
- WSUS configured: Device must scan Windows Update, not internal WSUS
Frequently Asked Questions
You're Done! What's Next
Congratulations! You've successfully set up Windows Autopatch in your organisation. You now have:
- ✓ Automatic monthly quality updates that flow safely through rings
- ✓ Feature updates delayed 6-12 months for stability
- ✓ Driver updates in Automatic mode (with Manual for executives)
- ✓ Microsoft 365 Apps and Edge updates managed automatically
- ✓ Clear monitoring dashboards to track everything
Your ongoing tasks:
- Monitor the "Not ready" tab weekly for devices failing registration
- Check update reports monthly for any devices showing errors
- Review your deployment ring groups quarterly (are they still accurate?)
- When major Windows versions release (like 25H2), validate in Ring 1 first